11 Miscellaneous
Connections and glues
What we ask from connections between different parts of the guitar are the following characteristics, in order of importance:
- The connection is at least as strong as the different parts
- Zero loss of energy
- Ample hardening time
- Crack-filling properties
- Transparency
Many guitar builders use, like their colleagues in the past, bone glue to reach these goals. However it is questionable whether nowadays this is (still) the best choice. Why should we use all kind of modern tools and construction methods and still stick to glue that was used centuries ago? An argument that is commonly used to defend that choice is the possibility to unfix the connection when needed does not sound as an advertising seller. Maybe with violins it is a different case but most parts of the classical guitar will never need to be repaired and construction and sound bars can be reached, replaced or repaired via the sound hole. These considerations may give rise to the choice of a sound hole that permits accessibility by hand. In the case your hands are exceptional large you have to consider not to do the repair work yourself. But of course the best idea is to construct your guitar and use glues in such a way that repair will never be needed.
Many guitar builders now recommend the use of resin glues as "Titebond" or even stronger epoxy glues (see e.g. ref. 22).
An important issue in choosing adequate glue is the question, whether the two surfaces can stick together perfectly. For many parts of the guitar that we have to glue together the surfaces will not join closely and small gaps will stay, especially when the different parts are relatively stiff. In that case crack-filling properties are a must. For that reason and in view of its strength I use almost exclusively slow drying two component epoxy glue.
Decorations
In the Renaissance as well as in the Baroque period string instruments were often used as a gift to a beloved or dreaded person. Gifts that reflected the admiration or devotion to the king, princess or whatsoever. That resulted in the situation that many instruments of that time, in our eyes, were overloaded with all kind of decorations. Different precious materials, like tropical hard woods, tortoise, abalone, ivory et cetera were ingenuously shaped and used in almost all parts of the instrument. Nowadays, at least for the classical guitar, less labor-intensive and less abundant decoration is preferred. Still it is worthwhile to give ample attention to the choice of materials, finish and decoration. Ultimately, we want to have a guitar that is gorgeous to listen to but also outrageous to look at!
Most important in this respect are the choice of wood and the finishing of it in the final stage of the construction. The material choice (including color and pattern) of the sides, back, top, neck, head, fret board and bridge should be compatible and their color and appearance should harmonize. It is better to stick to a limited number of wood species and materials. As a rule of thumb back, sides and head veneer are the same. The bridge may also follow that choice, as long as these parts are made of a relatively hard and strong wood.
How nice extra decoration may be, it never should have any negative effect on the acoustic quality or playability. From that point of view there is hardly room for any decoration on the bridge or on the top with an exception for the outline of the sound hole, where a specific "personal" rosette is quite usual.

Decorations that do not contribute to the strength or durability of the guitar are only allowed on those parts that should be completely rigid. As such can be mentioned the neck and head, the upper part of the sides (region of the upper bout) and the fret board as long as the playability is not affected.
Image: Personal label

As a form of "decoration" many guitar builders add a "personal touch" like the form of sculpture on top of the head. Also, nearly every guitar builder has a personal label, that is attached to the inside of the back, and is visible through the sound hole.
There are many ways to give your guitar such a personal touch and the best advice I can give you is: think about it, take your time and give it all the effort it asks for. It will pay off!
Final construction adjustments
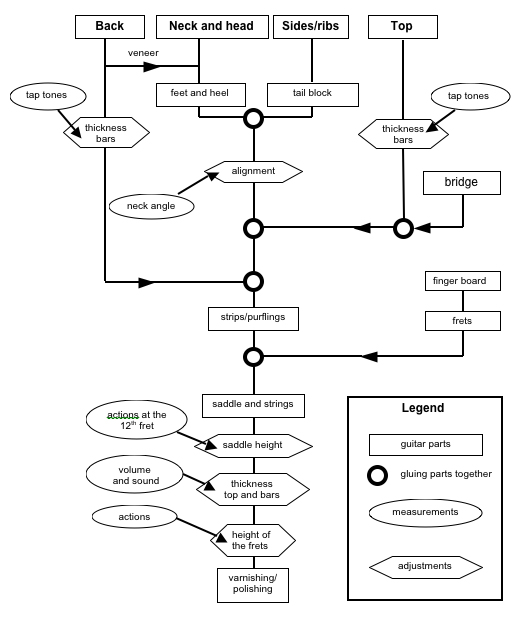
The different physical phenomena, influenced by materials, dimensions and construction are that complex that it is impossible for a given design to forecast exactly what the sound of that guitar will be. Not exactly but to a certain level of confidence we are able to construct a guitar which fulfills the wishes we have on the 5 main construction principles as described in the introduction. Still, it is wise to use the available possibilities to adjust the instrument to our special wishes during the construction as far as possible:
- Follow the "tap tone procedure" during the construction of the top and of the back.
- If you have the time, guts and the necessary tools, measure the deflection of the top and the back after completion (how to do it and which adjustments may be used is described in ref. 15).
- In the situation, that you have domed the top and decided upon the dimensions of the bridge and saddle you can select the body-neck angle to end up with an appropriate fret board. Less adequate but possible is to adjust the height of the saddle at the end of the construction (see chapter The neck and head).
- Sometimes the finger board is glued to the neck before fretting, sometimes afterwards. If you do it before, it gives you the opportunity for final adjustment (thinning) of the fingerboard in view of the action of the strings and the height of the saddle (see chapter The neck and head). However, fretting the fingerboard before it is glued to the neck is an easier and safer job.
- Polishing the top can be done before or after installing the bridge. Gluing the bridge afterwards has the advantage that polishing of the soundboard is easier and the result may look better. However, if you leave polishing to the very end (after you have installed the bridge) you can string it up, listen to the sound and make final adjustments to the thickness of the soundboard and the sound bars. Especially local thinning when the sound of the basses is too weak. This last improvement is so important that my advice is to install the bridge before the final polishing.
In case you wish to thin or enlarge the weight of specific bars (after or before complete finishing and tuning) the opening of the sound hole should be wide enough to do so. So the sound hole should be large enough for your hands to make those final adjustments possible.
In the flow chart below these possible adjustments are indicated.
Image: Guitar construction and adjustments


